我的環境配置:Windows 10、Unity 5.0.4f1、Java JDK 1.8.0_51、Android Studio 2.1.2。
2016/09/13 補充:加入取消本地端推播的方法,修正了點擊推播訊息前往 Unity 時會錯誤的問題,並且都修改到範例裡面。
如果你已經完成了之前的文章 "Android Studio 匯出 JAR 檔"、"Android Studio 匯出 JAR 檔 - 加入 Unity classes.jar"、"Android Studio 匯出 JAR 檔 - 在 Unity 中調用 Android Function" 的話。
那現在我們可以來嘗試加入 Android 的 "本地端推播 (LocalNotification)" 囉!
所謂的本地端推播,就是利用系統內建的 "鬧鐘系統 (AlarmManager)",設定在某個時間點時,發送我們設定好的 "廣播 (Broadcast)"。
而當這筆 "廣播 (Broadcast)" 被發送時,我們會在建立一個 "廣播接收器 (BroadcastReceiver)" 去接收該 "廣播 (Broadcast)"。
並且解析出內容後,使用 "推播系統 (NotificationManager)" 將資訊加入使用者的 "狀態列 (Status Bar)" 裡面,如此一來,我就們完成了 "本地端推播 (LocalNotification)" 功能了!
流程如下:
步驟一、
開啟 Android Studio。
相關的專案設置這邊不會再講,若不曉得的人,可以將 "Android Studio 匯出 JAR 檔" 系列的文章,快速瀏覽過一次。
或者直接下載 "Android Studio 匯出 JAR 檔 - 在 Unity 中調用 Android Function" 文章中的範例,也是可以的。
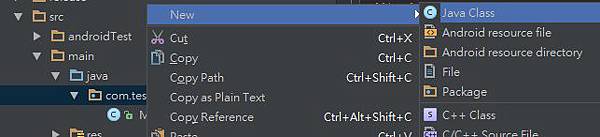
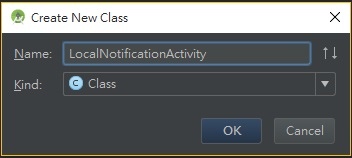
步驟二、
建立一個 Java Class。
名稱自訂,我這邊是命名為 "LocalNotificationActivity"
步驟三、
該 Class 是用來跟 Unity 溝通的,所以必須繼承 UnityPlayerActivity
public class LocalNotificationActivity extends UnityPlayerActivity {
}
步驟四、
再建立一個 Java Class。 名稱自訂,我這邊是命名為 "LocalNotificationReceiver"

步驟五、
該 Class 是用來接收廣播的,所以必須繼承 BroadcastReceiver。
public class LocalNotificationReceiver extends BroadcastReceiver {
  public LocalNotificationReceiver() {
  }

  @Override
  public void onReceive( Context context, Intent intent ) {
  }
}
步驟六、
回到 LocalNotificationActivity.java 裡,這邊我們添加兩個靜態 function,分別 Add 跟 Cancel。
Add:
該函數主要是把推播需要的資源封裝起來,再建立一個鬧鐘,在鬧鐘響起時,會將封裝好的資源廣播出去,它接收的參數為 "幾秒後推播訊息"、"訊息標題"、"訊息內文"、"訊息圖示"、"訊息編號"。
PS:訊息圖示非常重要,若沒有圖示的話,推播訊息則不會顯示。
Cancel:
該函數主要是用來取消鬧鐘用的,它接收的參數只有一個 "訊息編號",這邊會去通知系統將相同編號的鬧鐘做取消的動作。
而取消的重點在於 requestCode 與 Intent 必須跟當初建立鬧鐘時一樣,而 PendingIntent 就算不同也沒關係
以下有提到 PendingIntent 以及 AlarmManager 參數,這邊做個簡單的說明。
// PendingIntent.FLAG_CANCEL_CURRENT = 如果已經存在 PendingIntent, 則會取消目前的 Intent 後再產生新的 Intent.
// PendingIntent.FLAG_NO_CREATE = 如果並不存在 PendingIntent, 則傳回 null.
// PendingIntent.FLAG_ONE_SHOT = 此 PendingIntent 只能使用一次.
// PendingIntent.FLAG_UPDATE_CURRENT = 如果已存在 PendingIntent, 則更新 extra data.

// AlarmManager.RTC_WAKEUP = 鬧鐘在睡眠模式底下會喚醒系統並執行功能.
// AlarmManager.RTC = 鬧鐘在睡眠模式時不會運作.
public static void Add( final int second, final String title, final String content, final String iconSmall, final int requestCode ) {

  UnityPlayer.currentActivity.runOnUiThread( new Runnable() {
    public void run() {

      // 取得定時呼叫管理器
      AlarmManager alarmManager = (AlarmManager) UnityPlayer.currentActivity.getSystemService(Context.ALARM_SERVICE);

      // 封裝訊息
      Intent notificationIntent = new Intent(UnityPlayer.currentActivity, LocalNotificationReceiver.class);
      notificationIntent.putExtra("title", title);
      notificationIntent.putExtra("content", content);
      notificationIntent.putExtra("iconSmall", iconSmall);
          notificationIntent.putExtra("requestCode", requestCode);

      // 整理定時需要的資訊
      PendingIntent broadcast = PendingIntent.getBroadcast(UnityPlayer.currentActivity, requestCode, notificationIntent, PendingIntent.FLAG_CANCEL_CURRENT);

      // 設定時間
      Calendar calendar = Calendar.getInstance();
      calendar.add(Calendar.SECOND, second );

      // 加入定時
         alarmManager.set(AlarmManager.RTC_WAKEUP, calendar.getTimeInMillis(), broadcast);
    }
  } );
}

public static void Cancel( int requestCode ) {

          // 取得定時呼叫管理器
          AlarmManager alarmManager = (AlarmManager) UnityPlayer.currentActivity.getSystemService(Context.ALARM_SERVICE);

          // Intent 的 Receiver Class 必須跟當初建立鬧鐘時的 Receiver 一樣
          Intent notificationIntent = new Intent(UnityPlayer.currentActivity, LocalNotificationReceiver.class);

          // 取消定時, 這邊的重點在於 requestCode 與 Intent 必須跟當初建立鬧鐘時一樣,而 PendingIntent 就算不同也沒關係
          alarmManager.cancel( PendingIntent.getBroadcast(UnityPlayer.currentActivity, requestCode, notificationIntent, PendingIntent.FLAG_CANCEL_CURRENT) );
}
步驟七、
回到 LocalNotificationReceiver.java 裡面,這邊針對 onReceive 做了修改。
這邊主要是把鬧鐘廣播出去資源接收回來,之後解析出封裝好的資源後,再去建立推播。
這要注意到,因為我們需要返回 Unity 裡面,所以 Intent 必須是 new Intent(context, UnityPlayerActivity.class);。
可能有人發現取得 Resources 的方式,並非為 R.drawable.xxx。
這是因為,Android 專案打包 JAR 檔時,他只會打包你專案的 Class 而已,並不會打包專案內的 Resources,甚至引用的 Libraries 也不會打包在內。
所以這些資源必須額外複製一份到 Unity > Assets > Plugins > Android 裡面。
@Override
public void onReceive( Context context, Intent intent ) {

  String title = intent.getStringExtra("title");
  String content = intent.getStringExtra("content");
  String iconSmall = intent.getStringExtra("iconSmall");
  int requestCode = intent.getIntExtra("requestCode", 0);

  int smallIcon = context.getResources().getIdentifier(iconSmall, "drawable", context.getPackageName());

  // 這邊表示點擊推播訊息後, 要返回 Unity, 所以必須是 UnityPlayerActivity.class
  Intent newIntent = new Intent(context, UnityPlayerActivity.class);
  newIntent.setFlags(Intent.FLAG_ACTIVITY_SINGLE_TOP);

  PendingIntent pendingIntent = PendingIntent.getActivity(context, requestCode, newIntent, PendingIntent.FLAG_CANCEL_CURRENT); // 取得PendingIntent


  // 建立推播內容
  Notification.Builder builder = new Notification.Builder(context.getApplicationContext());

  // setSmallIcon 尺寸建議 32 * 32
  builder.setSmallIcon(smallIcon);
  builder.setContentTitle(title);
  builder.setContentText(content);
  builder.setContentIntent(pendingIntent);
  builder.setAutoCancel( true );
  Notification notification = builder.build();


  // 取得推播管理器, 執行推播
  NotificationManager notificationManager = (NotificationManager)context.getSystemService(Context.NOTIFICATION_SERVICE);
  notificationManager.notify(requestCode, notification);
}
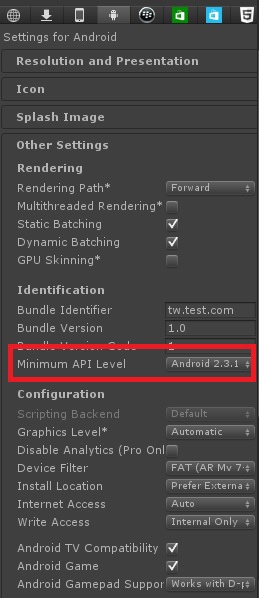
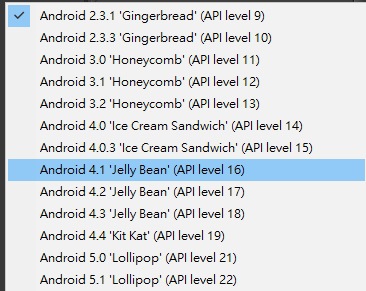
步驟八、
在這裡,我們使用了 Notification.Builder,該 Class 是比較新的,需要 Android API 版本 16 以上才能夠使用,所以記得去 Unity 專案,在 Edit > ProjectSettings > Player > Android > Other Settings > Minimum API Level,這邊要改成 16 以上
Unity > Assets > Plugins > Android > AndroidManifest.xml 將 <uses-sdk android:minSdkVersion="9" /> 修改至 16 以上。
若你是用 Unity 自己的 AndroidManifest.xml,那可能會沒有 uses-sdk android:minSdkVersion,若沒有的話,該步驟可跳過。
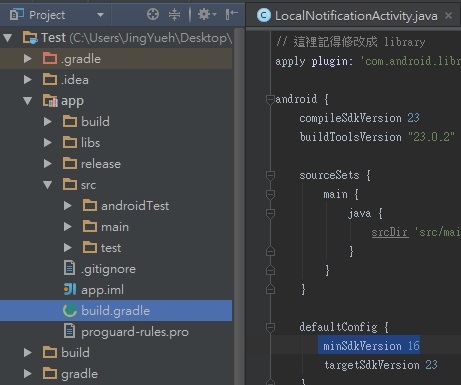
Android Studio >Test > app > src > build.gradle 裡面 defaultConfig 的 minSdkVersion 也記得要改成 16
步驟九、
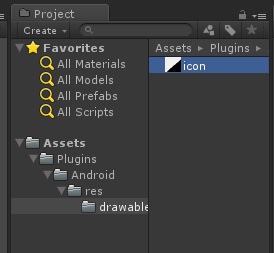
將會用到的 Resources 放到 Unity > Assets > Plugins > Android 裡面。
我簡單的製作一個小圖示來測試。
在 Unity 專案裡面建立資料夾 Unity > Assets > Plugins > Android > res > drawable。
接著把製作好的小圖示放進去,我命名為 icon.png。

這邊值得注意的是,新版 Android 似乎將狀態列的 Icon 改成只能顯示不透明與透明了,所有非透明的顏色都會以白色來顯示。
所以 Icon 設計上,盡量是以白色以及透明去製作,會比較精準一點,並且存成 PNG 檔。
步驟十、
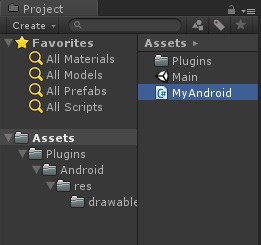
將 Android 打包匯出 JAR,並且放入 Unity > Assets > Plugins > Android

步驟十一、
打開 Unity > Assets > Plugins > Android > AndroidManifest.xml。
在 <manifest> 裡面 <application> 的外面加入權限設定,分別為 "震動"、"手機喚醒" 功能
<uses-permission android:name="android.permission.VIBRATE" />
<uses-permission android:name="android.permission.WAKE_LOCK" />
在 <application> 裡加入我們的 Activity 以及 Receiver
<activity android:name="com.test.tw.test.LocalNotificationActivity" />
<receiver android:name="com.test.tw.test.LocalNotificationReceiver" android:enabled="true" android:exported="true" />
步驟十二、
打開我們的測試腳本,將 OnGUI 修改如下
private void OnGUI()
{
Rect rect = new Rect( 0.0f, 0.0f, 200.0f, 100.0f );
if ( GUI.Button(rect, "本地推播") )
{
#if UNITY_ANDROID && !UNITY_EDITOR
using ( AndroidJavaClass unity = new AndroidJavaClass("com.test.tw.test.LocalNotificationActivity") )
{
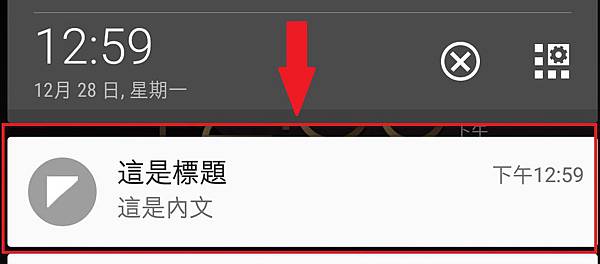
unity.CallStatic( "Add", 5, "這是標題", "這是內文", "icon", 100 );
}
#endif
}
rect = new Rect( 0.0f, 100.0f, 200.0f, 100.0f );
if ( GUI.Button(rect, "取消推播") )
{
#if UNITY_ANDROID && !UNITY_EDITOR
using ( AndroidJavaClass unity = new AndroidJavaClass("com.test.tw.test.LocalNotificationActivity") )
{
unity.CallStatic( "Cancel", 100 );
}
#endif
}
}
步驟十三、
最後運行結果

PS:這邊有一點值得注意的是,鬧鐘似乎最低秒數為 5 秒,若低於 5 秒的話,系統似乎會以 5 秒代替。

 留言列表
留言列表
