這邊會示範如何將 Google+ 登入功能加到 Android Studio 裡,並且讓 Unity 去呼叫使用。
首先我們下載 "Android Studio 匯出 JAR 檔 - 在 Android 中呼叫 Unity Method" 中的範例來進行實作。
我的環境配置:Windows 10、Unity 5.0.4f1、Java JDK 1.8.0_51、Android Studio 2.1.2。
步驟一:
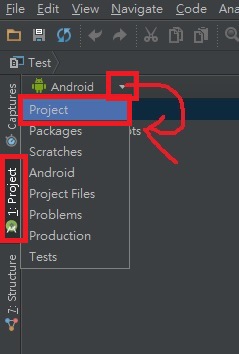
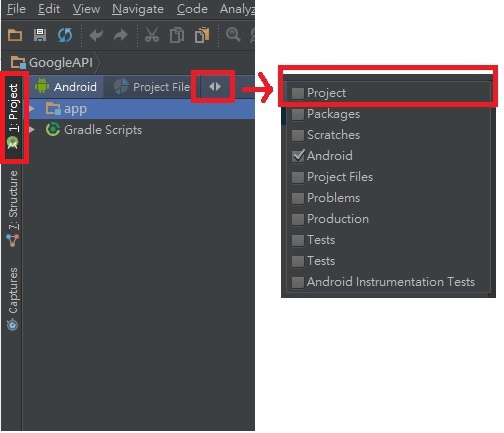
首先我們開啟該範例的 Android Studio 專案,將 Project 調整為 Project 模式
1.X 版的調整方式
2.X 版的調整方式
步驟二:
因為我們要使用 Google Plus 的 API,所以要載入相關資源。
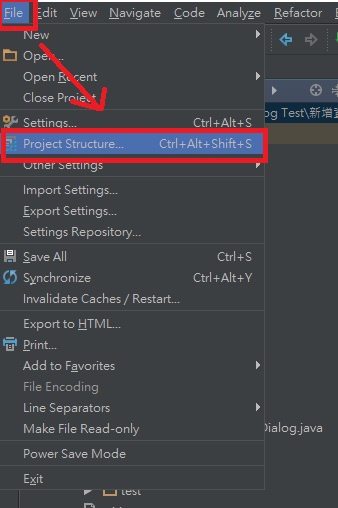
開啟 File > Project Structure...
步驟三:
開啟 Modules 底下的 app > 切換至 Dependencies > 點擊 + > 選擇 Library dependency

步驟四:
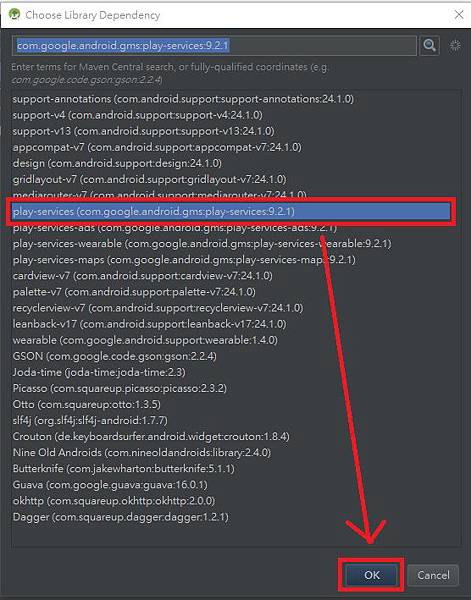
選取 play-services(com.google.android.gms:play-services) 並按下 OK
步驟五:
確認 com.google.android.gms:play-services 有被載入後,就可以按下 OK 按鈕讓系統執行資源載入了

步驟六:
接下來我們建立一個類別來處理 Google+ 的登入。
在 Test > app > src > main > java > com.test.tw.test 的 package 上點擊 滑鼠右鍵 > New > Java Class 來建立一個類別。

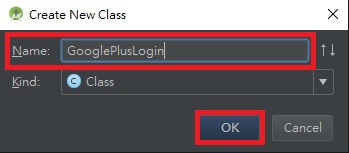
名稱隨意,這邊我取為 "GooglePlusLogin",輸入好後按下 OK
步驟七:
開啟剛剛建立的類別 Test > app > src > main > java > com.test.tw.test > GooglePlusLogin.java
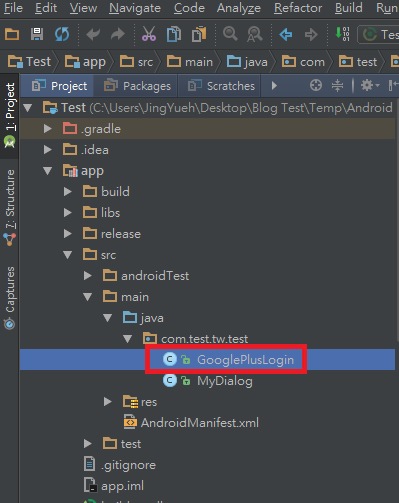
這邊我們要繼承 Activity 與 Google+ 登入失敗以及成功的 Interface,並實作方法。
程式碼如下
package com.test.tw.test;

import android.app.Activity;
import android.content.Intent;
import android.os.Bundle;
import android.support.annotation.NonNull;
import android.support.annotation.Nullable;

import com.google.android.gms.common.ConnectionResult;
import com.google.android.gms.common.api.GoogleApiClient;

public class GooglePlusLogin extends Activity implements GoogleApiClient.ConnectionCallbacks, GoogleApiClient.OnConnectionFailedListener {

    @Override
    protected void onCreate(Bundle savedInstanceState) {
        super.onCreate(savedInstanceState);

    }

    @Override
    protected void onActivityResult(int requestCode, int responseCode, Intent intent) {

    }


    // 以上方法為覆寫 Activity 父層的方法
    // 以下方法為實作 Google+ ConnectionCallbacks 與 OnConnectionFailedListener 的方法


    @Override
    public void onConnected(@Nullable Bundle bundle) {

    }

    @Override
    public void onConnectionSuspended(int i) {

    }

    @Override
    public void onConnectionFailed(@NonNull ConnectionResult connectionResult) {

    }

}
因為 Google+ 在登入時,它需要一個 Activity 才能夠運作,但是大家應該有發現,我們是繼承的是 Activity 而不是 UnityPlayerActivity,因為 Unity 好像只能有一個主要 UnityPlayerActivity 的 Activity。
裡面的方法 onCreate、onActivityResult 是屬於父層 Activity 的方法,我們要覆寫它。
而 onConnected、onConnectionSuspended、onConnectionFailed 則是 ConnectionCallbacks 與 OnConnectionFailedListener 這兩個 Interface 的方法,我們必須實作它。
步驟八:
開啟 Test > app > src > main > java > com.test.tw.test > MyDialog.java 檔案

步驟九:
因為該範例已經過測試,是可正常運作的,所以我們可以放心的直接使用。
現在我們在加上一個函數,名稱隨意,這邊我取為 "Login",用來呼叫登入 Google+ 使用
public static void Login(final String objectName, final String methodName) {

        Intent intent = new Intent( UnityPlayer.currentActivity, GooglePlusLogin.class );
        intent.putExtra("objectName", objectName);
        intent.putExtra("methodName", methodName);
        UnityPlayer.currentActivity.startActivity( intent );
}
在這邊要不要使用 UnityPlayer.currentActivity.runOnUiThread 都可以,都能夠正常運作。
我們接收 objectName 與 methodName 這兩個參數,來決定要回呼 Unity 中,哪個 GameObject 的方法,主要目的是想把會員登入後的資料回傳給 Unity。
Android 回呼 Unity 的方法,詳細可看這篇教學 "Android Studio 匯出 JAR 檔 - 在 Android 中呼叫 Unity Method"。
步驟十:
回到剛剛建立的類別 Test > app > src > main > java > com.test.tw.test > GooglePlusLogin.java

這邊我們補上所有登入的程式碼
package com.test.tw.test;


import android.app.Activity;
import android.content.Intent;
import android.content.IntentSender;
import android.os.Bundle;
import android.support.annotation.NonNull;
import android.support.annotation.Nullable;

import com.google.android.gms.common.ConnectionResult;
import com.google.android.gms.common.api.GoogleApiClient;
import com.google.android.gms.plus.Plus;
import com.google.android.gms.plus.model.people.Person;
import com.unity3d.player.UnityPlayer;

public class GooglePlusLogin extends Activity implements GoogleApiClient.ConnectionCallbacks, GoogleApiClient.OnConnectionFailedListener {

    private static final int RC_SIGN_IN = 0;

    private GoogleApiClient mGoogleApiClient;
    private String objectName, methodName;
    private Activity tempActivity;


    @Override
    protected void onCreate(Bundle savedInstanceState) {
        super.onCreate(savedInstanceState);

        // 暫存原本的 UnityPlayer.currentActivity, 之後關閉目前 Activity 時, 需要再還原回去
        tempActivity = UnityPlayer.currentActivity;

        // 這邊要將 UnityPlayer.currentActivit 設定為目前的 Activity, 否則 onActivityResult 不會被回呼
        UnityPlayer.currentActivity = this;

        // 取得上個 Activity 傳遞過來的參數
        Intent intent = getIntent();
        objectName = intent.getStringExtra("objectName");
        methodName = intent.getStringExtra("methodName");

        // 建立連線, 並設定好回呼
        mGoogleApiClient = new GoogleApiClient.Builder(this)
                .addConnectionCallbacks(this)
                .addOnConnectionFailedListener(this)
                .addApi(Plus.API, Plus.PlusOptions.builder().build())
                .addScope(Plus.SCOPE_PLUS_LOGIN)
                .build();

        // 開始連接登入
        mGoogleApiClient.connect();
    }

    @Override
    protected void onActivityResult(int requestCode, int responseCode, Intent intent) {

        switch (requestCode) {

            // 當 Activity 事情做完後, 都會回呼該方法, 所以這邊會檢查剛剛處理的事情是不是 Google+ 登入,
            // 如果是 Google+ 登入的話, 則檢查是不是登入成功了?
            // 若還沒登入成功的話, 則重新再執行連接登入一次.
            case RC_SIGN_IN:
                if (!mGoogleApiClient.isConnecting()) {
                    mGoogleApiClient.connect();
                }
                break;
        }
    }


    // 以上方法為覆寫 Activity 父層的方法
    // 以下方法為實作 Google+ ConnectionCallbacks 與 OnConnectionFailedListener 的方法


    @Override
    public void onConnected(@Nullable Bundle bundle) {

        try {
            if (Plus.PeopleApi.getCurrentPerson(mGoogleApiClient) != null) {

                Person currentPerson = Plus.PeopleApi.getCurrentPerson(mGoogleApiClient);

                // 登入成功!
                // 取得使用者名稱, 並回傳給 Unity
                String userName = currentPerson.getDisplayName();
                UnityPlayer.UnitySendMessage(objectName, methodName, userName);
            }
        } catch (Exception e) {
            e.printStackTrace();
        }

        // 連線完成, 關閉 Activity
        UnityPlayer.currentActivity = tempActivity;
        finish();
    }

    @Override
    public void onConnectionSuspended(int i) {
    }

    @Override
    public void onConnectionFailed(@NonNull ConnectionResult connectionResult) {

        try {
            // 連接失敗或該用戶沒有在該 APP 登入過的紀錄, 這邊請用戶在重新登入一次
            connectionResult.startResolutionForResult(UnityPlayer.currentActivity, RC_SIGN_IN);
        } catch (IntentSender.SendIntentException e) {
            e.printStackTrace();

            // 若出錯了, 就關閉 Activity
            UnityPlayer.currentActivity = tempActivity;
            finish();
        }
    }

}
大致上的運作流程如下
A 程式進入 -> 首先進入 onCreate 建立 Google 連線後,並開始登入。
B 登入成功 -> 該 APP 有登入紀錄,所以登入成功,接著進入 onConnected,取得使用者資訊後回傳給 Unity。
C 登入失敗 -> 該 APP 無登入紀錄,所以登入失敗,接著進入 onConnectionFailed,讓使用者重新選擇登入帳號。
D 選擇登入帳號後 -> 不管成功於否,都會進入 onActivityResult 判斷是否登入成功,成功的話則回到流程 B,失敗則回到流程 C。
因為使用者若故意不登入的話,則會在 C -> D -> C -> D 之間無限的循環,所以這邊需要額外偵測失敗次數,並讓程式跳出迴圈,這邊我們就沒實作了。
這邊有一點需要特別特別的注意到!那就是必須將 UnityPlayer.currentActivity 設為目前的 Activity,否則 onActivityResult 不會被回呼!
接著登入完成或失敗要執行 finish() 關閉 Activity 時,記得再將 UnityPlayer.currentActivity 還原,否則會讓其它程式再調用 UnityPlayer.currentActivity 的時候錯誤!
因為 UnityPlayer.currentActivity 已經被設定為 Google 連線時用的 Activity,而該 Activity 也被我們 finish() 了,所以 UnityPlayer.currentActivity 會變成 Null!
儲存後將 JAR 打包匯出至 Unity 專案中。
詳細 JAR 匯出步驟請到以下網頁查看
"Android Studio 匯出 JAR 檔" 步驟四、五、六 有說明如何匯出 JAR 以及匯出位置。
"Android Studio 匯出 JAR 檔 - 在 Unity 中調用 Android Function" 步驟二 有說明 JAR 要放到 Unity 的哪個位置。
不過要記得先將舊的 JAR 移除喔!
步驟十一:
開啟該範例的 Unity 專案,我們在 Plugins > Android 資料夾上按滑鼠右鍵,選擇 Create > Folder,建立兩個資料夾,分別命名為 libs、res。


步驟十二:
載入需要的 JAR 資源,因為 Google Plus Login 需要用到的 JAR 都是由 Android Studio 去建立的,所以我們需要把有用到的 JAR 從 Android Studio 中複製一份到 Unity 裡面。
首先先找到 (你的 Android SDK 目錄位置)\android-sdk-windows\extras\android\support\v4\android-support-v4.jar

將 android-support-v4.jar 拖曳到 Unity 的 Assets > Plugins > Android > libs 裡面

但是接下來的 JAR 比較麻煩,我們必須檢查每一項 import 是引用到哪個 com.google.android.gms:play-services 的 JAR,再將這 JAR 拖曳一份到 Unity 裡面。
可能有人會說將所有 com.google.android.gms:play-services 的 JAR 都複製一份到 Unity 裡面就好,但事實上這是行不通的,因為這些 JAR 有些是有衝突的!
我有嘗試過將所有 JAR 都複製一份到 Unity 裡面,但是包版時就報錯了,所以最保險的方式還是一項一項的檢查,有用到的再複製一份到 Unity 吧!
首先回到 Test > app > src > main > java > com.test.tw.test > GooglePlusLogin.java

我們在程式碼最上方找到 com.google.android.gms 相關的 import,所以我們只要將這些有用到的資源複製一份到 Unity 就可以了
import com.google.android.gms.common.ConnectionResult;
import com.google.android.gms.common.api.GoogleApiClient;
import com.google.android.gms.plus.Plus;
import com.google.android.gms.plus.model.people.Person;
我們在 ConnectionResult 上方點擊滑鼠右鍵,選擇 Go To > Declaration,進到該類別的內部

接著我們會發現程式碼最上方有個 Choose Sources...,我們直接點擊它

最後它告訴我們,該類別是引用了以下 classes.jar,以及顯示了該 JAR 的檔案位置
(你的 Android Studio 專案路徑位置)\Android Studio\Test\app\build\intermediates\exploded-aar\com.google.android.gms\play-services-basement\9.2.1\jars\classes.jar

所以我們沿著它所提供的位置,找到了 play-services-basement 的 JAR 檔案

我們一樣將它拖曳到 Unity 的 Assets > Plugins > Android > libs 裡面

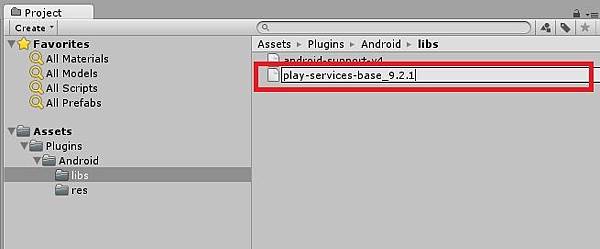
但是因為每個 JAR 都被命名為 classes.jar 了,所以都拖曳到 Unity 裡面時,名稱會重複,因此這邊我們將名稱做修改,一方面是為了避免名稱重複,一方面也是為了方便辨識!
這邊我們將 play-services-basement 拖曳過來的 classes.jar 更名為 play-services-basement_9.2.1
接下來一樣的步驟去檢查 GoogleApiClient、Plus、Person 這三個類別引用了些 JAR!
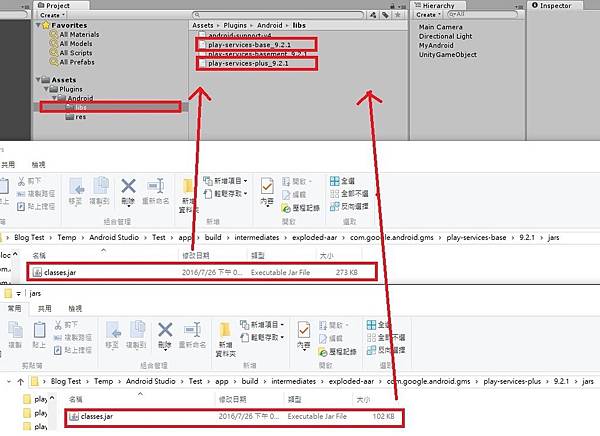
最後發現 GoogleApiClient 引用了 play-services-base,Plus、Person 引用了 play-services-plus。
所以一樣的步驟,找到 JAR 位置,將 JAR 拖曳至 Unity 中,再更改名稱
步驟十三:
在 Google 執行登入之前,我們需要在 AndroidManifest.xml 檔案裡額外添加一些資訊。
打開 Assets > Plugins > Android > AndroidManifest.xml
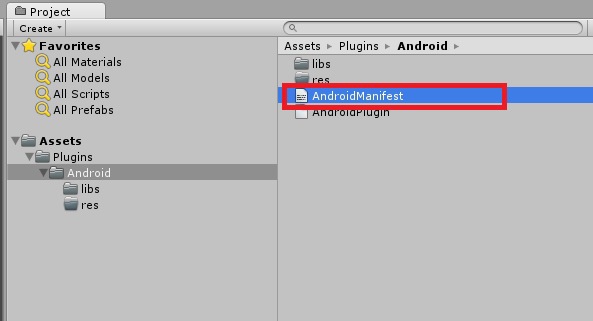
我們將 <uses-permission android:name="android.permission.INTERNET"/> 網路權限,添加到 <manifest></manifest> 裡面。
以及 <meta-data android:name="com.google.android.gms.version" android:value="@integer/google_play_services_version"/> google_play_services 的版本資訊,添加到 <application></application> 裡面。
還有我們建立的 Activity <activity android:name="com.test.tw.test.GooglePlusLogin" />
添加完後會是這樣的
<?xml version="1.0" encoding="utf-8"?>
<manifest
    xmlns:android="http://schemas.android.com/apk/res/android"
    package="com.unity3d.player"
      android:installLocation="preferExternal"
    android:versionCode="1"
    android:versionName="1.0">

    <supports-screens
        android:smallScreens="true"
        android:normalScreens="true"
        android:largeScreens="true"
        android:xlargeScreens="true"
        android:anyDensity="true"/>

      <!-- 網路權限 -->
      <uses-permission android:name="android.permission.INTERNET"/>

    <application
            android:theme="@android:style/Theme.NoTitleBar.Fullscreen"
            android:icon="@drawable/app_icon"
        android:label="@string/app_name"
        android:debuggable="true">

            <!-- google_play_services 的版本資訊 -->
            <meta-data android:name="com.google.android.gms.version" android:value="@integer/google_play_services_version"/>

        <activity android:name="com.unity3d.player.UnityPlayerActivity"
                  android:label="@string/app_name">
            <intent-filter>
                <action android:name="android.intent.action.MAIN" />
                <category android:name="android.intent.category.LAUNCHER" />
            </intent-filter>
            <meta-data android:name="unityplayer.UnityActivity" android:value="true" />
        </activity>

            <!-- 添加我們剛剛建立的 Activity -->
        <activity android:name="com.test.tw.test.MyDialog" />
        <activity android:name="com.test.tw.test.GooglePlusLogin" />

    </application>
</manifest>
步驟十四:
因為我們有用到 @integer/google_play_services_version,所以很明顯的,我們還需要去找到存放該筆資訊檔案,並且拉到 Unity 裡面。
而這個檔案就是 play-services-basement 的 res 資料夾中的 values.xml。
檔案路徑為 (你的 Android Studio 專案路徑位置)\Android Studio\Test\app\build\intermediates\exploded-aar\com.google.android.gms\play-services-basement\9.2.1\res\values

但這次我們將整個 value 資料夾拖曳過去 Unity 裡面
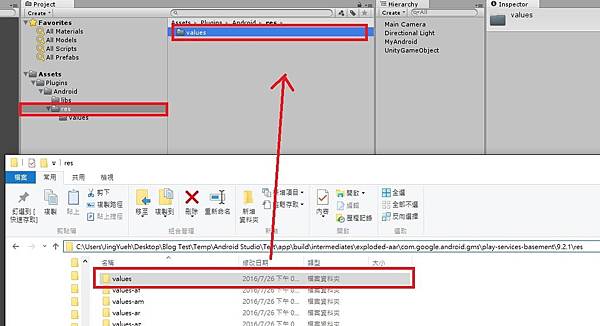
因為不這樣做的話,Unity 會報錯......
而且 res 資料夾不要整個拖過去,一樣會衝突報錯,所以跟 JAR 一樣,有需要的再拖過去吧!
步驟十五:
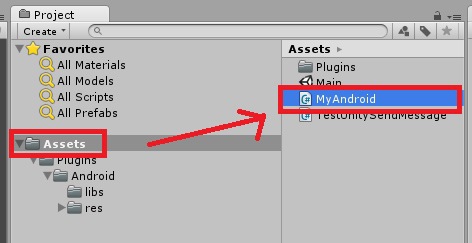
開啟 Assets > MyAndroid.cs
步驟十六:
我們在 OnGUI 方法裡面,再添加一個按鈕,來呼叫 Google+ 登入的功能
// 建立登入按鈕
rect = new Rect( 400.0f, 0.0f, 200.0f, 100.0f );
if ( GUI.Button( rect, "Google+ Login" ) )
{
    #if UNITY_ANDROID && !UNITY_EDITOR

    using ( AndroidJavaClass unity = new AndroidJavaClass("com.test.tw.test.MyDialog") )
    {
        unity.CallStatic( "Login", this.gameObject.name, "OnConnected" );
    }

    #endif
}
再添加顯示使用者名稱的 Label,記得要先宣告變數 private string userName = string.Empty;
// 跟使用者打招呼
rect = new Rect( 0.0f, 100.0f, Screen.width, 100.0f );
GUIStyle style = GUI.skin.GetStyle( "Label" );
style.fontSize = 30;
GUI.Label( rect, "你好啊!" + this.userName, style );
再添加要給 Android 回呼的方法
// 要給 Android 回呼的方法
public void OnConnected( string name )
{
    this.userName = name;
}
步驟十七:
接下來我們要建立 Keystore,這個步驟非常重要!若 Keystore 不對的話,就沒辦法登入了。
打開 File > Build Settings...,選擇 Android 後再點擊 Player Settings...
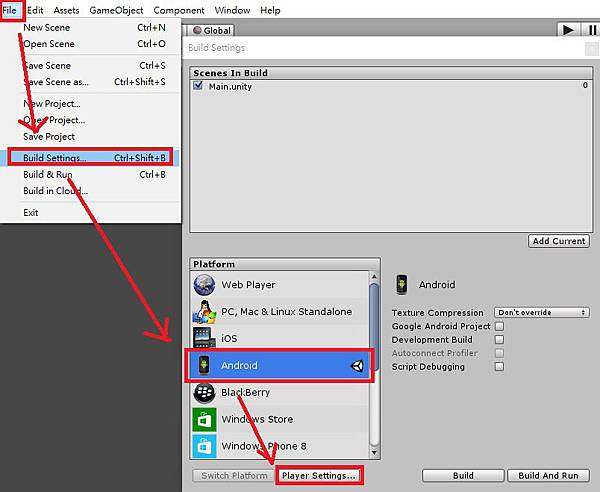
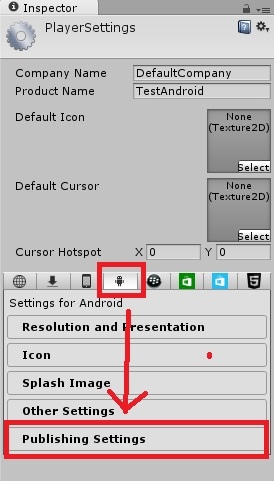
點選 Android 選擇 Publishing Settings
勾選 Create New Keystore 並點擊 Browse Keystore 選擇 Keystore 要存放的位置,位置跟名稱隨意,這邊我命名為 "TestGooglePlus.keystore",在按下存檔
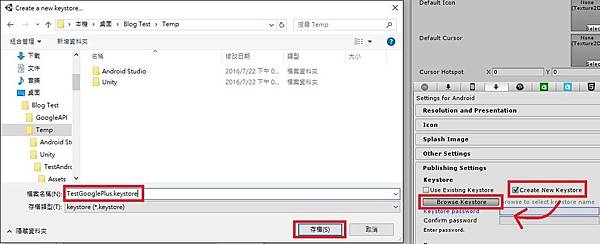
設定密碼,密碼長度要 6 以上,這邊我設定為 "test1234"

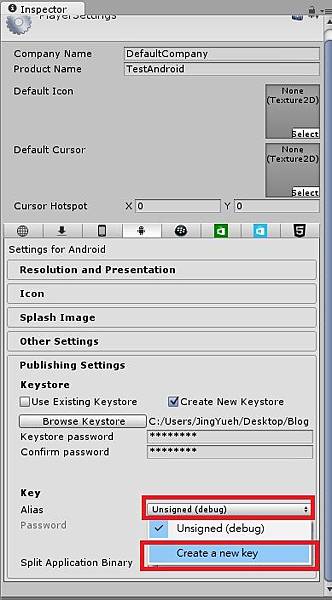
接著打開 Alias 選擇 Create a new key
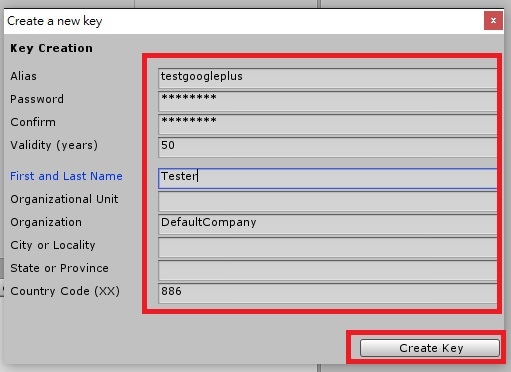
輸入你自己的資訊後,就可以按下 Create Key,我一樣建立一個 "testgoogleplus" 的名稱,密碼為 "test1234"
到這邊就算是把 Keystore 建立完成了!
接下來選擇 Use Existing Keystore,並且按下 Browse Keystore,選擇你剛建立的 Key
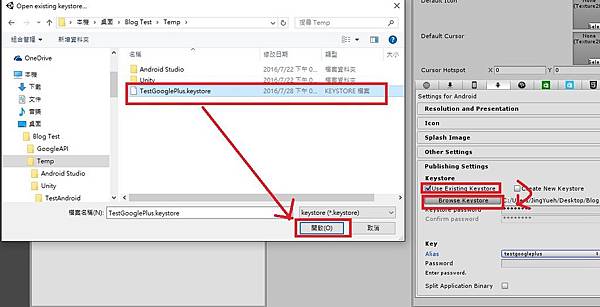
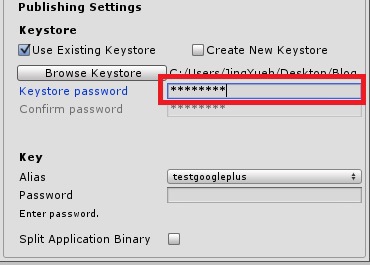
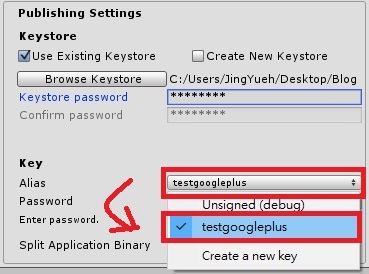
輸入 Keystore 的密碼後,再打開 Alias,選擇你剛剛建立的 Alias,並且輸入密碼
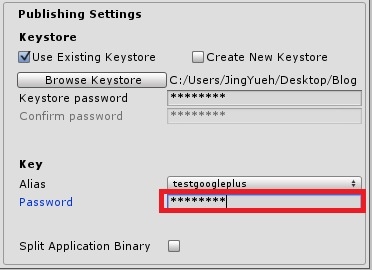
以後如果要包版時候,就是跟上面的步驟一樣,選擇你的 Keystore 再輸入密碼,接著選擇 Alias 再輸入密碼,就可以了!
這個 Keystore 是非常重要的!請小心保管好,之後你的 Android APK 要包版時,都得靠它呢!
步驟十八:
打開 File > Build Settings...,按下 Build,輸入好名稱並選擇個位置後,就按存檔吧

這邊我直接使用 Build And Run

到這邊,我們的 Unity 與 Android 的部分就完成囉!
接下來請到 "在 Unity 中調用 Android 的 Google+ 登入 - 啟動 API 與認證" 這篇文章繼續吧!
該教學的一系列文章:
文章標籤
全站熱搜


 留言列表
留言列表
